
Home Improvement
How to Choose the Perfect Dresser for Your Bedroom


Keeping a bedroom tidy can be challenging when clothing, accessories and everyday essentials have no dedicated storage space. A well-chosen dresser offers a simple way to organise these items while adding style and functionality to your interior. Whether you have a spacious bedroom or a compact living space, the right furniture can help you make better use of the room.
Why Is a Dresser Useful in the Bedroom?
A dresser provides practical storage for clothing and personal belongings that you want to keep within easy reach. It is particularly useful for folded garments, socks, accessories and other smaller items that can be difficult to organise in a wardrobe.
The drawers help separate belongings into categories, making it easier to find what you need without searching through piles of clothing. A tidy storage arrangement can also make daily routines quicker and more convenient.
Many dressers feature a flat top surface that can hold a mirror, a lamp, decorative accessories or a small tray for everyday essentials. This allows one piece of furniture to serve several purposes without taking up excessive space.
Select the Right Size for Your Room
Before purchasing a dresser, measure the area where you intend to place it. Consider its width, height and depth, along with enough clearance to open the drawers fully.
A narrow dresser can be suitable for smaller bedrooms where floor space is limited. Wider models may provide greater storage capacity for larger households or people with extensive clothing collections.
It is also important to consider the height of the furniture. A lower dresser can create a more open appearance, while a taller design may offer additional storage without occupying as much floor space.
Avoid choosing a unit simply because it looks attractive. The most suitable option should fit comfortably into your bedroom and provide enough room for everyday movement.
Consider the Number of Drawers
Different dresser designs offer different storage arrangements. Some feature a few large drawers, while others include several smaller compartments.
Large drawers are useful for jumpers, trousers and other folded garments. Smaller drawers can help organise underwear, socks, belts and accessories. If you prefer keeping different clothing categories separate, a model with several drawers may be more convenient.
Think about your current storage habits before deciding. A practical arrangement that suits your belongings will make it easier to maintain an organised bedroom over time.
You can explore different styles and sizes of dresser to compare storage options and find a design that suits your home.
Match the Dresser to Your Bedroom Décor
Bedroom furniture should work together to create a comfortable and balanced appearance. Choosing a dresser that complements your bed frame, wardrobe and bedside furniture can help achieve a coordinated interior.
White furniture is a popular option for bright, contemporary bedrooms. Wood-effect finishes introduce warmth, while grey and darker colours can complement modern decorative schemes.
You do not necessarily need every item of furniture to match exactly. Combining complementary colours and finishes can create a more individual look while maintaining visual consistency.
For a simple approach, choose a dresser with clean lines and a finish that works with your existing décor.
Look for Quality and Practical Features
A dresser should be designed for regular use, so pay attention to its construction and functionality. Check that the drawers open smoothly and that the handles feel comfortable to use.
The materials and overall build quality also matter. A sturdy frame and well-supported drawers can contribute to long-term usability. If you have limited space, consider a design that offers generous storage without an unnecessarily bulky appearance.
Safety is another important consideration. Tall or narrow furniture should be secured to the wall according to the manufacturer’s instructions, especially in households with young children.
Keep Your Dresser Organised
Even a spacious dresser can become cluttered without a simple organisation system. Assign each drawer a purpose, such as everyday clothing, accessories or seasonal garments.
Fold clothes neatly to make better use of the available space. Small organisers can help separate accessories and prevent smaller items from becoming mixed together.
Keep the top surface relatively clear. A mirror, lamp or a few decorative pieces can add character without turning the dresser into another source of clutter.
Reviewing the contents occasionally also helps you remove items you no longer use and maintain an efficient storage arrangement.
Frequently Asked Questions
What is the main purpose of a dresser?
A dresser provides drawer-based storage for clothing, accessories and personal belongings. Its top surface can also be used for a mirror or decorative items.
Is a dresser suitable for a small bedroom?
Yes. A compact or narrow dresser can provide useful storage while taking up relatively little floor space. Always measure the room before buying.
Can a dresser complement a wardrobe?
Yes. A dresser and wardrobe serve different storage purposes. The wardrobe is useful for hanging clothes, while the dresser is ideal for folded garments and smaller items.
Conclusion
A suitable dresser can improve bedroom organisation while complementing the room’s overall design. By considering size, drawer configuration, materials and appearance, you can choose furniture that meets your everyday needs. With a little planning, a dresser becomes a practical addition that helps keep your bedroom neat, functional and comfortable.

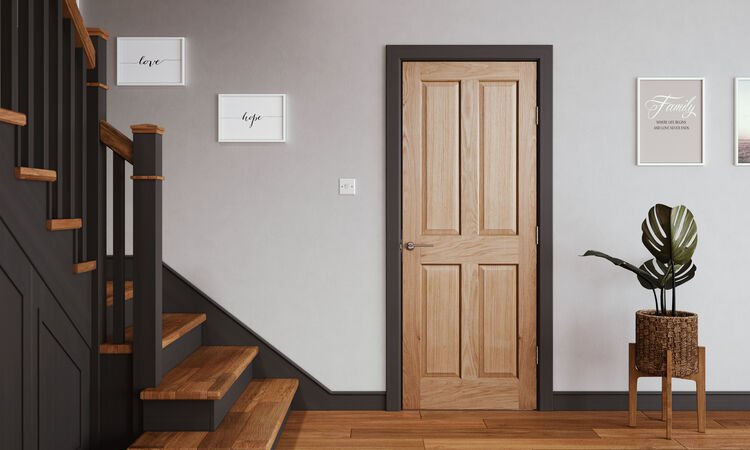
Oak interior doors sit at the intersection of design and daily use. The grain adds warmth, the weight adds presence, and the finish determines how the door handles fingerprints, steam, sunlight, and scrapes. When you are deciding between prefinished and unfinished oak, the right choice usually depends on how fast you need the doors installed, how precisely you want to match surrounding woodwork, and how each room behaves. This guide breaks down practical differences that matter in real homes, from lacquer sheen and oil feel to glazing, trimming limits, and long-term upkeep. You will leave with a clear way to choose what fits your timeline, your rooms, and your style.
- When Prefinished Oak Makes Sense
Choose prefinished oak when speed and uniformity are priorities. Factory-applied coatings arrive ready to hang, so you can skip site sanding and curing time. This reliability helps on time-sensitive projects like a rental refresh or a multi-door hallway where consistent color and sheen matter. Prefinished doors typically have an even satin or matt lacquer that resists everyday handling, so entry-level maintenance is a damp microfiber cloth rather than periodic re-oiling. For a quick sense of what’s possible, you can view oak-finished internal doors to compare grain direction, panel layouts, and glazed openings before finalizing a look.
Prefinished doors also reduce site-finishing risks, such as dust nibs settling in wet varnish or streaks from uneven staining. Because the color coat and topcoat are applied in a controlled environment, edge tone and face panels usually match well across a set. That said, you will still need to drill for hardware and lightly seal any freshly exposed timber at latch cutouts or hinge mortises to prevent moisture wicking into the core over time.
- Where Unfinished Still Wins
Unfinished oak is the right move when you need a custom color or a richer, hand-rubbed look. If your stair treads or floorboards are a specific smoked oak tone, site finishing lets you tune the stain to blend. You can choose an oil that enhances figure and open grain, or a tinted varnish that pulls the door closer to existing casing and baseboards. This route favors period homes and spaces where matching surrounding millwork takes priority over a rapid schedule.
There are trade-offs. Site finishing adds mess, odor, and dry time. You must seal all faces and edges, including the top and bottom of the slab and any new cuts after trimming. Missing an edge is a common mistake that lets bathroom steam or kitchen humidity into the core, causing swelling near the latch or softening around hinge screws. To reduce blotching on end grain, many finishers condition the wood or wipe back stain before clear coats, especially on rails and stiles that absorb differently than flat panels.
- Finish Types: Lacquer, Oil, or Varnish?
Lacquer, common on prefinished doors, creates a thin, hard film that keeps fingerprints and minor scuffs at bay. It preserves oak’s pale gold tone and suits high-traffic spaces like hallways and living rooms. Oil finishes soak into the fibers, deepen color, and deliver a tactile, low-sheen surface that feels natural to the touch. They are forgiving to touch up but typically need periodic re-oiling. Varnish or polyurethane builds a thicker protective layer that improves moisture resistance and can be a smart pick for half baths or near a busy kitchen.
Maintenance follows the chemistry. Lacquered and varnished doors respond well to a soft cloth and a pH-neutral cleaner; avoid abrasive pads and ammonia-based sprays that can haze the surface. Oiled doors benefit from a light recoat as the sheen dulls, especially around the handle set, where contact is constant. For minor dings, a matching wax filler or stain pen can disguise a mark before you refresh the top layer. Good ventilation helps in humid rooms, and sealing freshly drilled holes keeps edges stable.
- Construction Details That Affect Fit and Feel
Beyond the finish, what is inside the slab matters. A solid core or engineered core door feels substantial, damps sound better than hollow constructions, and closes with a reassuring thud. That extra mass calls for robust hinges, typically three per door, and careful alignment of the latch and strike. Trimming has limits: most oak-veneered doors include a solid lipping around the edges, but remove too much, and you risk exposing the substrate beneath the veneer. Always confirm allowable trim and, if you do shorten a leaf, reseal the new edge before hanging. If a space needs a fire-rated door, follow the manufacturer’s strict guidance on hardware, seals, and edge modification.
Glazing, Privacy, and Light for Real Rooms
Glazed oak doors borrow daylight without losing timber’s warmth. Clear glass works for a dining room where you want openness between spaces. Frosted, reeded, or sandblasted glass balances light with privacy in a home office or bath. Safety glass, often laminated or tempered, is standard for internal glazed apertures and worth confirming when children are around. Solid doors excel where sound and seclusion matter most, like bedrooms or media rooms, and can pair with perimeter seals for extra hush. If a hallway lacks natural light, a glazed oak door on the adjacent room can turn it from a cave into a corridor you enjoy using.
The best decisions start before you order. Measure existing frames at several points to catch out-of-square openings, check swing direction against nearby furniture, and note floor coverings that could reduce clearance. Acclimate new doors indoors, flat and supported, until they match room temperature and humidity. Then choose prefinished for speed and consistent sheen, or unfinished for color control and a tailored look. Match finish chemistry to room conditions, mind trimming and edge sealing, and think carefully about glazing where light or privacy is at stake. With those calls made, oak rewards you every time the handle turns.


Starting an Essex house extension project helps create more living space, improves comfort, and could potentially increase your overall property’s value without the stress of moving. Prioritising careful preparation can make the difference between a successful project and an expensive one. According to SunLife’s 2025 Life Well Spent report, the average amount spent on a home extension was £22,325, compared to £26,417 in 2024. These figures demonstrate why homeowners need to plan their budgets carefully before starting construction.
4 Common Mistakes To Avoid When Planning Your House Extension In Essex, UK
Here are some common mistakes to avoid when planning your home extension in Essex, UK.
- Not Consulting Experienced Residential Architecture Firms
Although it may seem cheaper to manage everything independently, overlooking important design and planning considerations can lead to expensive problems later. One of the best decisions Essex homeowners can make before starting an extension project is seeking professional architectural advice. Experienced residential architecture firms understand how to develop practical house extension Essex designs that complement existing properties while making the best use of the available space.
- Underestimating Your Extension Budget
Any Essex house extension project involves several additional expenses, including architectural fees, structural engineering, building control, materials, electrical installations, and plumbing. Unexpected problems, such as drainage complications or structural weaknesses, can also increase your spending. It is also sensible to maintain a contingency fund for unforeseen expenses and prepare a detailed budget covering both the main construction work and associated professional services.
- Ignoring Planning Permission And Building Regulations
Assuming that every house extension can proceed without permission is a costly mistake. While some extensions may qualify for permitted development rights, others may require planning permission. The rules depend on factors such as the extension’s dimensions, location, property type, and previous alterations. Additional restrictions may apply to listed buildings and properties in designated areas. Property owners should always check the relevant requirements with their local planning authority in Essex.
- Choosing a Design That Does Not Suit Your Lifestyle
A beautiful extension can still be disappointing if it does not meet your household’s everyday needs. For example, a large kitchen extension might look impressive but provide insufficient storage or poor access to the garden. Similarly, adding a bedroom without considering natural light, ventilation, and privacy may reduce its practicality. Discussing your core priorities with your architect before finalising the design is essential for getting the best results. A carefully-planned extension should improve how you live and increase your property’s floor area.
Planning a house extension in Essex requires choosing an attractive design, finding a great builder, and understanding your budget. Planning requirements, architectural decisions, and contractor selection can all influence the final outcome. Avoiding these common mistakes can reduce unnecessary expenses, minimize delays, and create a home that better suits your family’s needs. Consulting experienced residential architecture firms such as HumphreysandSons can help you approach your extension with a clearer design strategy and a better understanding of the steps involved. With proper preparation, realistic financial planning and the right professionals, your Essex house extension can become a worthwhile investment in your property’s functionality, comfort, and long-term appeal.


Introduction
A blocked toilet always seems to happen at the worst possible moment. You flush, expect the water to disappear, and instead the level in the bowl starts rising. Your first reaction may be to flush again, reach for a strong cleaning product, or try to push the blockage away with whatever tool is nearby.
But is that actually the best approach?
If you want to verstopfte Toilette frei bekommen, the first step is not finding the strongest product. It is understanding what caused the blockage and how far into the drainage system it may have travelled. A simple paper blockage can often be handled at home, while repeated backups or problems affecting several drains may point toward a larger plumbing issue.
This guide explains the most sensible ways to deal with a blocked WC, the mistakes worth avoiding, and when professional Rohrreinigung becomes the better option.
1. What Does a Blocked Toilet Actually Tell You?
Not every toilet blockage is the same. The symptoms can provide useful clues about where the problem may be located.
If the water rises immediately after flushing but slowly disappears after several minutes, the obstruction may be relatively close to the toilet trap. This can happen because of excessive toilet paper or material that does not break down easily.
A toilet that repeatedly drains slowly is different. It may indicate that the pipe is only partially restricted. In this situation, the toilet can appear to work normally one moment and become blocked again shortly afterwards.
There is another important warning sign: other fixtures start behaving strangely at the same time. For example, the shower may drain slowly, the sink may gurgle, or water may appear in another bathroom fixture when the toilet is flushed. These symptoms can suggest that the obstruction is farther down the drainage line rather than directly inside the toilet.
That distinction matters because repeatedly plunging the toilet will not necessarily solve a blockage located deeper in the pipe system.
2. Before Anything Else: Stop the Water
The easiest way to turn a small plumbing problem into a messy one is to keep flushing.
If the water level is already rising, stop using the flush immediately. Turn off the small shut-off valve supplying the cistern. Keep towels or an old cloth around the toilet in case some water spills during the next steps.
If the bowl is almost full, carefully remove some water with a container and place it in a bucket. This gives you more working space and reduces the risk of an overflow.
This simple preparation is particularly important when you are attempting a DIY solution. A toilet blockage is inconvenient; contaminated water spreading across the bathroom is considerably worse.
3. Can a Plunger Really Solve the Problem?
Yes—but only when it is used correctly.
A toilet plunger creates pressure and suction around the outlet. The objective is not simply to push the blockage farther into the pipe. Instead, repeated controlled movement can loosen the material and allow it to move through the drainage path.
For a better result:
- Make sure there is enough water in the bowl to cover the rubber part of the plunger.
- Position the plunger directly over the toilet outlet.
- Create a reasonably tight seal.
- Press down gently at first.
- Follow with several firm, controlled strokes.
- Pause and check whether the water level begins to fall.
- Repeat rather than immediately flushing again.
A toilet-specific flange plunger generally provides a better seal than a basic flat sink plunger.
Do not use excessive force. Aggressive plunging can cause dirty water to splash around the bathroom and may not help if the obstruction is caused by a solid object.
4. What About Warm Water and Dish Soap?
For a relatively mild blockage caused by paper or organic material, warm water combined with a small amount of dish soap may sometimes help.
The soap can make the surfaces more slippery, while warm water may soften some material. However, the water should not be boiling.
Very hot or boiling water can create unnecessary thermal stress on porcelain and other toilet components. It is also not a magic solution for objects such as toys, sanitary products or wipes.
Allow the mixture some time to work rather than immediately flushing. If the water level drops naturally, test the toilet cautiously.
The key point is that this method is better viewed as a gentle attempt for a minor obstruction—not as a substitute for proper equipment when a serious blockage exists.
5. Why You Should Think Twice About Chemical Drain Cleaners
When searching online for ways to verstopfte Toilette frei bekommen, you will find plenty of suggestions involving powerful chemical products.
However, stronger does not automatically mean better.
Chemical drain cleaners can be corrosive and may create additional hazards if they fail to remove the obstruction. If the chemical remains in standing water and you later use a plunger or another tool, it can potentially splash back onto your skin or eyes. Some professional plumbing guidance also warns that aggressive chemicals may damage plumbing components.
There is another practical problem: a solid object does not simply disappear because a chemical product is poured into the toilet. A child’s toy, hygiene product or other foreign object generally requires mechanical removal.
For this reason, mechanical methods such as a suitable toilet plunger or toilet auger are usually more logical starting points than randomly pouring strong chemicals into the bowl.
Never mix different drain-cleaning chemicals.
6. What If Something Has Fallen Into the Toilet?
This is where DIY attempts can easily make the situation worse.
Suppose a small object, cosmetic container, toy or another solid item has accidentally fallen into the bowl. The instinct may be to flush it and hope it disappears.
That can turn a visible problem into a hidden one.
If you can safely reach and remove the object without forcing it deeper, that may solve the problem. But if the object has already moved into the trap or pipe, repeated flushing or poking with improvised metal tools can make removal more difficult.
Toilet augers are designed specifically for this type of mechanical clearing and can be safer for the porcelain than improvised wires or metal objects. A professional can also determine whether the blockage is inside the toilet or farther along the drainage route.
7. When Is It No Longer Just a Toilet Problem?
One of the most important questions is whether the blockage is actually limited to the WC.
Watch for these signs:
- The toilet becomes blocked repeatedly.
- Water drains slowly even after the apparent blockage is removed.
- The shower or bathtub also begins draining slowly.
- A sink makes bubbling or gurgling sounds.
- Water rises in another fixture when the toilet is flushed.
- An unpleasant sewage smell becomes noticeable.
- The toilet is the only usable WC in the property.
- A foreign object has disappeared down the toilet.
- Plunging provides only temporary improvement.
When several drains show symptoms together, the issue may be located farther down the shared drainage system. In such cases, professional Rohrreinigung can be more appropriate than repeatedly treating the toilet itself.
A deeper blockage may require a suitable drain-cleaning spiral or other professional equipment. Depending on the situation, specialists can also investigate the line to determine whether the obstruction is local or further along the drainage system.
8. Benefits of Solving the Problem the Right Way
Taking a measured approach to a blocked toilet has several advantages.
Less risk of overflow
Stopping the water supply before experimenting with solutions reduces the chance of wastewater spreading across the bathroom.
Lower risk of damage
Using the correct toilet tools is preferable to pushing random objects into the drain or exposing porcelain and pipe components to aggressive chemicals.
Better diagnosis
Looking at the symptoms can help distinguish between a simple toilet blockage and a problem affecting the wider drainage system.
Avoiding repeated blockages
If a toilet keeps becoming blocked, simply clearing the immediate obstruction may not address the underlying cause. A professional inspection can be useful when the same problem repeatedly returns.
More efficient repairs
When the blockage is deeper than the toilet trap, professional equipment can reach areas that household methods cannot.
9. How to Prevent the Next Toilet Blockage
Prevention is much easier than dealing with an overflowing toilet.
Only flush materials intended to go through a toilet drainage system. Avoid putting wipes, sanitary products, cotton items, kitchen paper, food waste or other unsuitable materials into the WC.
It is also worth paying attention to how the toilet flushes. If the flush has gradually become weaker, water disappears unusually slowly, or the toilet frequently requires several attempts, investigate the problem instead of waiting for a complete blockage.
Recurring problems deserve attention because a partial restriction can eventually become a complete obstruction.
10. When Should You Call a Professional?
A simple blockage does not necessarily require immediate professional assistance. If a plunger successfully restores normal drainage and the toilet works normally afterwards, the problem may have been relatively minor.
Professional help becomes more sensible when basic mechanical methods fail, the blockage repeatedly returns, a foreign object is involved, or other drains are affected.
Most importantly, do not continue experimenting indefinitely. If the bowl is close to overflowing or wastewater is backing up elsewhere, stop using the affected fixtures.
A professional Rohrreinigung service can determine where the obstruction is located and select the appropriate method rather than relying on guesswork.
Conclusion
Knowing how to verstopfte Toilette frei bekommen is useful, but knowing when to stop trying DIY methods is just as important.
Start by preventing an overflow, shut off the water and assess the symptoms. For a straightforward blockage, a properly positioned toilet plunger may be enough. Warm—not boiling—water and a little dish soap can also be worth trying for a mild obstruction.
However, solid objects, repeated blockages and symptoms involving several drains require a different approach. In those situations, forcing the problem deeper or repeatedly applying chemical products can create more complications.
The goal should not simply be to make the water disappear once. The real goal is to restore reliable drainage without damaging the toilet or hiding a larger problem in the pipe system. When the evidence points beyond the toilet itself, professional Rohrreinigung is often the more practical and safer solution.

How to Choose the Perfect Dresser for Your Bedroom

Single Trip or Multi Trip Super Sack Bags – Which Suits Your Operation?

The Reshoring Effect: Why US Manufacturers Are Turning to Custom Automation Machinery to Stay Competitive

Who Is Shameera? All You Need To Know About Charli XCX’s Mother

Who Is Gulliver Flynn Oldman? The Untold Story of Sir Gary Oldman’s Son

Meet Rosemary Turner: The Mother of Actor Callum Turner
-
Biographies9 months ago
Who Is Shameera? All You Need To Know About Charli XCX’s Mother
-
Biographies8 months ago
Who Is Gulliver Flynn Oldman? The Untold Story of Sir Gary Oldman’s Son
-
Biographies9 months ago
Meet Rosemary Turner: The Mother of Actor Callum Turner
-

 Biographies7 months ago
Who is Alexandra James? Inside The Life of Jeremy Clarkson’s Former Partner
-
 Biographies9 months ago
Who is Todd McRae? Meet Tate McRae’s Father
-
 Biographies8 months ago
Who Is Daniel Mara? The Untold Story of Kate Mara’s Private Sibling
-
 Celebrity9 months ago
Who Is Peter Hernandez? The Real Story of Bruno Mars’ Father
-

 Blog5 months ago
AI Video for Social Media: How Small Brands Keep Up Without Burning Out